Troubleshooting Problems with a Golf Cart Electric Motor
Nov 19th 2016
Whether you rely solely on your golf cart for transportation or not, it is always inconvenient when it’s on the fritz. It is doubly awkward if it breaks down when you are out away from home. Instead of immediately calling the repairman and paying those exorbitant prices, there are a few things that are quick and easy to check for yourself. So, grab your screwdriver and multimeter, and you will have the problem tracked down in no time.

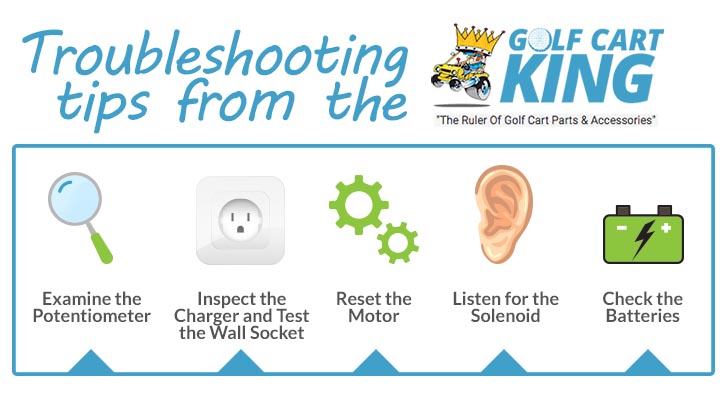
Check the Batteries
Before you start tearing your golf cart apart, take a moment to simply test the voltage of the batteries. It’s a simple thing, but can easily be overlooked—like when a lamp isn’t working, and you replace the bulb and check all the wiring just to find out it's unplugged.
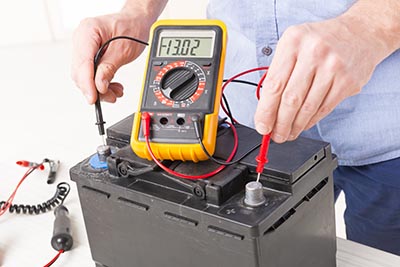
Verify the proper voltage for the type of battery you use (most are between 12 and 48 volts), and then use your multimeter to check the charge on each of your batteries. You will have to remove the clamps connected to your battery cables first to get an accurate reading.
Test each battery individually. Many battery chargers must detect a minimum voltage to begin recharging, so, if a battery has gone completely dead, it will not recharge. It is possible you could use an external charger to override this problem, but you may also need to replace the battery.
Remember that batteries will lose voltage even when they are not in use. Often electric motors will draw a small amount of electricity when they are not running, so if you haven’t used the cart in a long time, it will need a charge before it is ready to go again.
Inspect each battery to make sure it is in working order. Remove the battery cap and check the water and electrolyte levels in each battery. There should be enough water to cover the conductive plates, but it should not be full to the top. Replace depleted water only with distilled water.
If any of your battery terminals are dirty and corroded, use a solution of baking soda and water with a stiff brush to clean them up for better contact. Voltage retention also decreases with age, so it may be time to replace old batteries. You can extend the life of your batteries by fully charging them each time you connect the charger.
The battery cables could also be your issue. A bad connection could prevent electricity from reaching the batteries when the charger is connected or prevent the batteries from distributing power to the rest of the cart.
Inspect the cables running to each battery. If there is evident corrosion, clean it off to improve connectivity. If you see any loose or frayed wires, do your best to reconnect them. If you cannot reconnect the wires, or if corrosion is so bad the connections are simply rusted away, replace your battery cables.

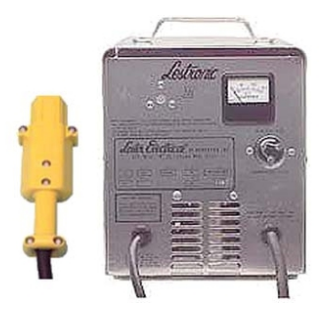
Inspect the Charger and Test the Wall Socket
After you’ve verified your battery is in working order, it’s time to move on to the charging process. First, inspect all of the wires in your charger. If there are any loose connections or corrosion, this may be the issue. Clean it up and repair any damaged connections.
If your charging cord is often tightly coiled or bent, it is possible that a wire broke somewhere inside the cable. You may be able to feel a broken wire through the outer coating, but it is more likely you will need to take the casing off to see. If you suspect a broken wire, it is probable you will have toreplace the charger.
There may also be an internal fuse that has gone bad, so carefully remove the cover and inspect all of the interior parts as well. Never disable the electronic timer on the battery charger. It will overcharge the batteries and make them useless.
If your charger appears to be in working order, check the circuit breaker going to the power outlet where it is plugged in, especially if there was recently a power outage or power surge. Specialty outlets like the one for your charger trip circuit breakers more easily, so you may have a tripped breaker even if the house, in general, didn’t experience anything unusual.
Once you’ve verified the breaker is on, check there is electricity flowing to the socket itself. Insert the contact of the multimeter into the socket. Remember, if you are using a voltmeter that is not adjustable, you will need a different meter that matches the proper voltage.
If there is no power reaching the wall socket, call a household electrician to restore the flow of electricity.

Listen for the Solenoid
With the batteries and charging checked off of your list, the solenoid should be your next point of interest. The solenoid allows electricity to flow from your batteries to the electric motor. It usually makes a clicking noise when you turn the key to the “on” position. It is engaged each time you turn on the cart and every time you step on the accelerator or the brake, so it is a part that can wear out quickly. If you’re unsure if it is working, it is simple to test.
There are four terminals on a solenoid: usually two large and two small. The small terminals are connected to the battery, and the large terminals are connected to the motor. Disconnect all wires from the two large terminals. Be sure to keep the wires together, but not touching, for easy replacement.
Start with the key in the “off” position, and the cart direction in “neutral.” Set your multimeter to ohms and place one contact on each terminal. It should read “0” in this position. Switch the direction to forward, turn the cart on, and press the accelerator. As we mentioned earlier, you should hear a click. If you do, leave your multimeter set to ohms and place one contact on each terminal. The reading should be between 0 and 0.4 ohms. If it is higher, the solenoid is defective and needs to be replaced.

If you don’t hear a click when the cart is on and you’re pressing the accelerator, switch your multimeter to volts and place a contact on each of the small solenoid terminals. These small terminals connect to the batteries.
Place the cart in forward and step on the accelerator. If the voltage shows a full battery charge, but there is still no click, the coil inside of the solenoid has broken and needs to be replaced. If the voltage shows “0,” there is a problem elsewhere. Go back and check the batteries and charger, or move on to the next step.

Examine the Potentiometer
If your solenoid is working and the cart still isn’t going, there is one last part to check before you reset the entire motor. You may have never come across the potentiometer before, but it is an important part to keep your golf cart going. It sends an electrical signal to the speed controller from the accelerator pedal, indicating the pedal’s position.
When it is working properly, the potentiometer allows your golf cart to accelerate smoothly. Find your potentiometer and inspect it for any cracks, broken parts, or disconnected wires. Also, ensure the electrical signal on the potentiometer matches the range on the controller. The cart will not run if there is a mismatch.
If the potentiometer looks like it is intact and in good shape, there are a couple things to check. There is a lever on the potentiometer that controls how fast it allows the cart to go. It is possible it may have slipped and is preventing an adequate signal from being sent to the controller.
Loosen the small nut on the side and try moving the lever. It is extremely sensitive, so start with small increments. If the lever is in the correct place, your next step is to use your multimeter to test its output. Most golf cart potentiometers are 5K – 0 ohms, which means the potentiometer relays 5,000 ohms when you floor the accelerator. Some older models use volts instead, so double check the resistance type before you try to test the output.
There are two terminals on a potentiometer. Switch your multimeter to ohms and place one contact on each of the terminals. It should read 0 when the accelerator is not depressed, and then rise as you push the pedal down. If your readings are erratic or out of the normal range, it is time to replace the potentiometer.

Reset the Motor
Just like many other electronics, an electric golf cart motor sometimes just needs to be restarted to clear the cobwebs. If you’ve checked and double-checked all of the parts mentioned above, and the cart still isn’t moving, you’ll want to reset the motor.
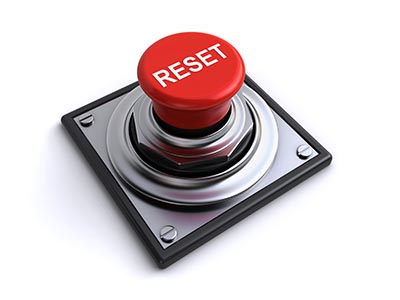
t’s simple to do – just a press of a button. The reset button acts as a mini circuit breaker for the motor, so it will correct any minor errors. Expose the motor (you’ll probably need a screwdriver to remove the cover), and look for a red button. It is usually near the main power source, where most of the wires are connected. Once you’ve pressed the button to reset the motor, reassemble the cart, charge up the batteries, and give it a test run.
If you’ve reset the motor and the cart will still not run, there are a few things that could be wrong with your electric motor. If everything else is working properly but the motor does not spin, it may be burnt out. You can burn out a motor by overloading the golf cart or using it on too steep a grade.
If the motor is burnt out, it must be completely replaced. If the motor is spinning but still not working, you can remove the whole motor and give it a thorough inspection. Small parts like bearings or coils can be replaced, but if larger parts like the motor housing are damaged, you will probably need a new motor. The motor is usually the last component of a cart to fail, so call a professional before you invest in a brand new motor.

Precautions
Before you begin diagnosing your electric golf cart, there are a couple safety precautions to keep in mind. Always have the manual handy to help you find and identify the parts you want to test. When testing the batteries on a wall socket, make sure you know how to properly use your multimeter.
If it is an adjustable meter, make sure it is set to the correct measurement type and the correct amount of voltage for the element you are testing. Always unplug the cart from the charger before testing any of the electrical components. When reassembling any parts, make sure they are connected correctly.

With a wire in the wrong place, you could cause a short or another electrical issue that will make your problem worse. Always make sure wiring connections are clean and tight, for safety and for the best contact.
Golf cart batteries are highly corrosive, so avoid spills at all times. Wear protective gloves when testing or cleaning your battery. It is also recommended to wear protective glasses when you are handling the battery, so corrosive liquid does not splash into your eyes.
Be careful never to place tools or other metal objects on top of the batteries. If a metal object touches both terminals, it will cause the battery to arc and possibly explode. When you examine the battery charger, make sure to unplug it from the wall socket to avoid electric shock. The voltage inside a battery charger is very high and could be fatal if it enters your body.
Always ensure your batteries are rated for the charger voltage. If the voltage is too high, it will cause overheating, which could lead to an equipment fire.

Conclusion
By locating a problem yourself, you can save some money on an expensive repairman’s time. Keep a few simple tools stored on your golf cart so you can test and make repairs anywhere. If a part breaks, and you have a little extra time and an internet connection, you can save even more by replacing the part yourself.
Find a reputable dealer online that carries the parts for the make and model of your golf cart, and it can be shipped to your house quickly. If you’re unsure of exactly how to replace the part, you can find helpful instructional videos on golf cart forums or on YouTube. With some time, confidence, and a few tools, you’ll have your cart up and running again in no time.